The "Optimal" Window
A lateral window opening of an appropriate size at a proper location facilitates a smooth sinus floor elevation. A couple of aspects that dictate how an "optimal" window looks include:
Window Size & Location
The lateral window should be large enough to allow proper visualization of the surgical site, access of surgical instruments for safe lifting of the Schneiderian membrane and delivery of the bone graft with ease. On the other hand, it should not be too large to jeopardize the retention of grafting material and reduce the amount of vital bone wall for its osteogenic power. Depending on their experience, some dental surgeons could perform the same surgery efficiently and effectively with a smaller sized window. Generally, it is recommended to create a lateral window measuring at least 5 mm vertically and 8 to 10 mm horizontally if a single implant is to be placed. It was suggested that the ideal position of the window is to be as mesial and low as possible in relation to the maxillary sinus (Zaniol & Zaniol, 2017).
Bone Wall Thickness & Convexity
Bone Wall Thickness & Convexity
Sinus bone wall can be paper-thin. So much so that it can appear bluish when a mucoperiostal flap is raised, allowing clinicians to know exactly where the sinus is located. In these cases any sharp cut could lacerate the sinus membrane. It is however a surgical advantage if the window bone rim is within a certain thickness, i.e., within 1 mm. Thicker bone wall may increase the cutting time and reduce visibility when approaching the sinus membrane. If the window is small, positioning of sinus curettes may be difficult. Besides, some sinus walls appear flatter and others more convex, as they extend from the zygomatic buttress. It could be hard to lift a window at a convex slope, which requires more skill to avoid damaging the membrane.
Neighboring Teeth
Neighboring Teeth
The roots of the neighboring teeth may present with different curvatures and lengths. Sometimes they may be proximal to the anterior wall of the sinus, and close to the superficial cortex of the alveolar bone proper. Damage to adjacent teeth during surgery may result in root resorption or pulpal necrosis, especially if the neurovascular supply to the dental pulp is interrupted. Keeping a good 2 mm away from them is essential to avoid unwanted post-operative complications.
Sinus Septum
Sinus Septum
The sinus septum, which is present in roughly 30 percent of patients, is a known risk factor for sinus membrane perforation (Testori, Weinstein, Taschieri, & Wallace, 2019). Different surgical approaches were discussed in the literature to cope with this problem. For a fully developed septum that separates the maxillary sinus into an anterior and a posterior zone, two windows could be prepared on either side of the septum. Sinus floor elevation could then be performed separately for the two compartments. On the other hand, for a relatively small septum, a larger window encompassing the septum could be prepared. By removing the sinus bone wall, the lining membrane can then be elevated from both sides of the septum.
Arterial Anastomosis
Arterial Anastomosis
An accidental cut into an artery near the maxillary sinus may not result in a life-threatening event, but it certainly impairs surgical site visibility and increases the difficulty of managing the surgery. The blood supply to the maxillary sinus has three origins: the infraorbital artery, the posterior lateral nasal artery, and the posterior superior alveolar artery (PSAA), with their intercommunicating anastomoses (Rosano, Taschieri, Gaudy, & Del Fabbro, 2009). Intraosseous and extraosseous anastomoses run along the lateral wall of the sinus, in which the intraosseous vessels are usually situated at a more crestal position than the extraosseous counterpart (Solar et al., 1999). An intraosseous anastomosis is present in almost 100% of patients but only visible on cone-beam CT imaging in 50% of the cases. An anastomosis of the PSAA running across the lateral wall of the maxillary sinus is a potential threat. It was reported to be present in 20% of the normally positioned antrostomy area, and presents a potential risk of intraoperative hemorrhage (Elian, Wallace, Cho, Jalbout, & Froum, 2005).
The Concept of Guided Sinus Surgery
The Concept of Guided Sinus Surgery
All the above factors must be taken into consideration when selecting the desired area in which a lateral window can be created. Before the cone-beam CT (CBCT) was commonly available, much depended on the anatomical knowledge and surgical experience of the operator. Extraoral and intraoral X-rays provided information about the size of the sinus in relation to the neighboring vital structures. Visual inspection and percussion feedback on the bony surface during the surgery often provided hints as well. Moreover, measurement could be performed from neighboring teeth and the alveolar crest to determine where the desired window should be prepared. The ideal location for the lateral window was approximated. Once a window was created, adjustment could be made by incremental enlargement to achieve the preferred size and shape.
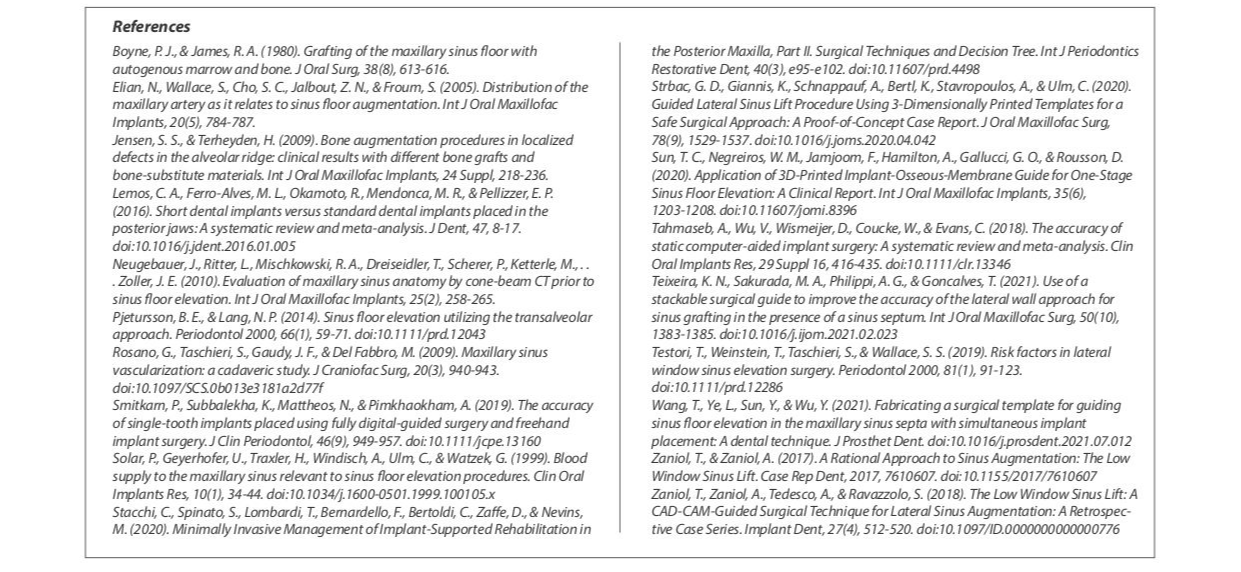
With technological advances, CBCT allows us to perform even more realistic surgical planning than previously imagined. It is possible to see, in different planes and in three dimensions, how the different anatomical structures relate to one another. Intraosseous blood vessels running along the sinus wall can be identified. In the case of an irregularly shaped sinus, we can design a window which follows the slope of the sinus floor to tailor our cut. The location and dimension of the sinus septum can also be evaluated (Neugebauer et al., 2010). It is now possible to draw the optimal lateral window in the planning software with full confidence of accuracy.
Currently, CAD/CAM technology also allows computer-aided implant surgery (CAIS) to be accurately carried out (Smitkarn, Subbalekha, Mattheos, & Pimkhaokham, 2019; Tahmaseb, Wu, Wismeijer, Coucke, & Evans, 2018). Surgical guides are fabricated to facilitate implant osteotomy and placement. The same principle can be applied to the creation of a surgical guide for a lateral window for sinus floor augmentation (Strbac et al., 2020; Zaniol, Zaniol, Tedesco, & Ravazzolo, 2018).
Clinical Application of Sinus Guides
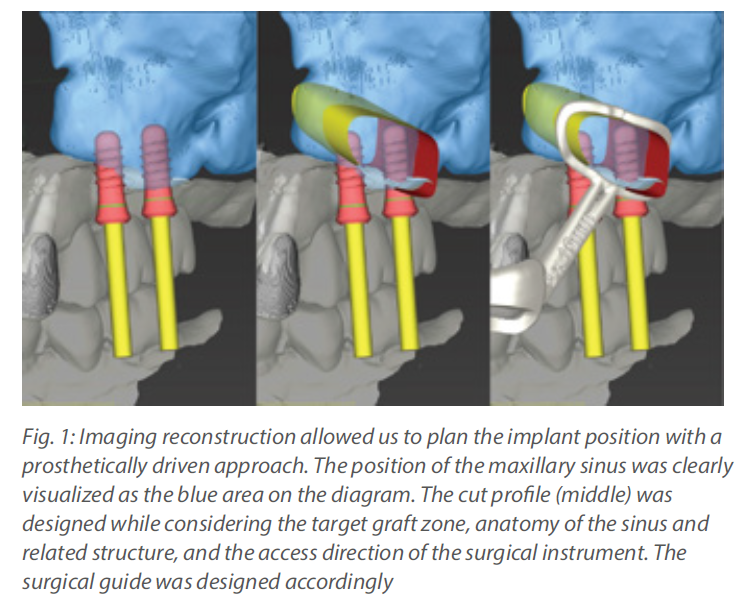
A few cases show how a sinus guide allows an efficient and safe antrostomy to be performed. In the first case, a CBCT, virtual study model and diagnostic wax up model were imported into an implant planning software (coDiagnostiX version 10.2, Dental Wings). The window was designed to stay close to the anterior and inferior border of the maxillary sinus, with sufficient space for the instrument to work at the target grafting area.
Within the planning software, the cut profile was drawn, taking into consideration that a round bur or piezo tip would be running within. It was therefore designed to be slightly larger than the actual window. By extending the cut profile into a full circle, it gave complete guidance for the outline of the window. It also suggested the superior extent of the mucoperiosteal flap required to allow adequate exposure for the antrostomy. The dimension of the window guide was set to be an offset of 0.5 mm away from bone, with a window rim width of 1.5 mm and thickness of 1.0 mm. According to these parameters, a thin guide was produced to reduce spatial hindrance and allow maximum visibility for the surgery. The actual guide would be flexible rather than rigid due to the slim design. This was not a concern because the guide was not intended to physically guide the instrument. It only served as a reference for the window that would be made freehand. The rest of the guide was designed to cover the occlusal surface of all maxillary teeth to provide adequate stability. Inspection windows were created at a couple of occlusal spots to allow verification of proper seating of the surgical guide during use. The subsequent surgery was performed as described in the photos.
Within the planning software, the cut profile was drawn, taking into consideration that a round bur or piezo tip would be running within. It was therefore designed to be slightly larger than the actual window. By extending the cut profile into a full circle, it gave complete guidance for the outline of the window. It also suggested the superior extent of the mucoperiosteal flap required to allow adequate exposure for the antrostomy. The dimension of the window guide was set to be an offset of 0.5 mm away from bone, with a window rim width of 1.5 mm and thickness of 1.0 mm. According to these parameters, a thin guide was produced to reduce spatial hindrance and allow maximum visibility for the surgery. The actual guide would be flexible rather than rigid due to the slim design. This was not a concern because the guide was not intended to physically guide the instrument. It only served as a reference for the window that would be made freehand. The rest of the guide was designed to cover the occlusal surface of all maxillary teeth to provide adequate stability. Inspection windows were created at a couple of occlusal spots to allow verification of proper seating of the surgical guide during use. The subsequent surgery was performed as described in the photos.
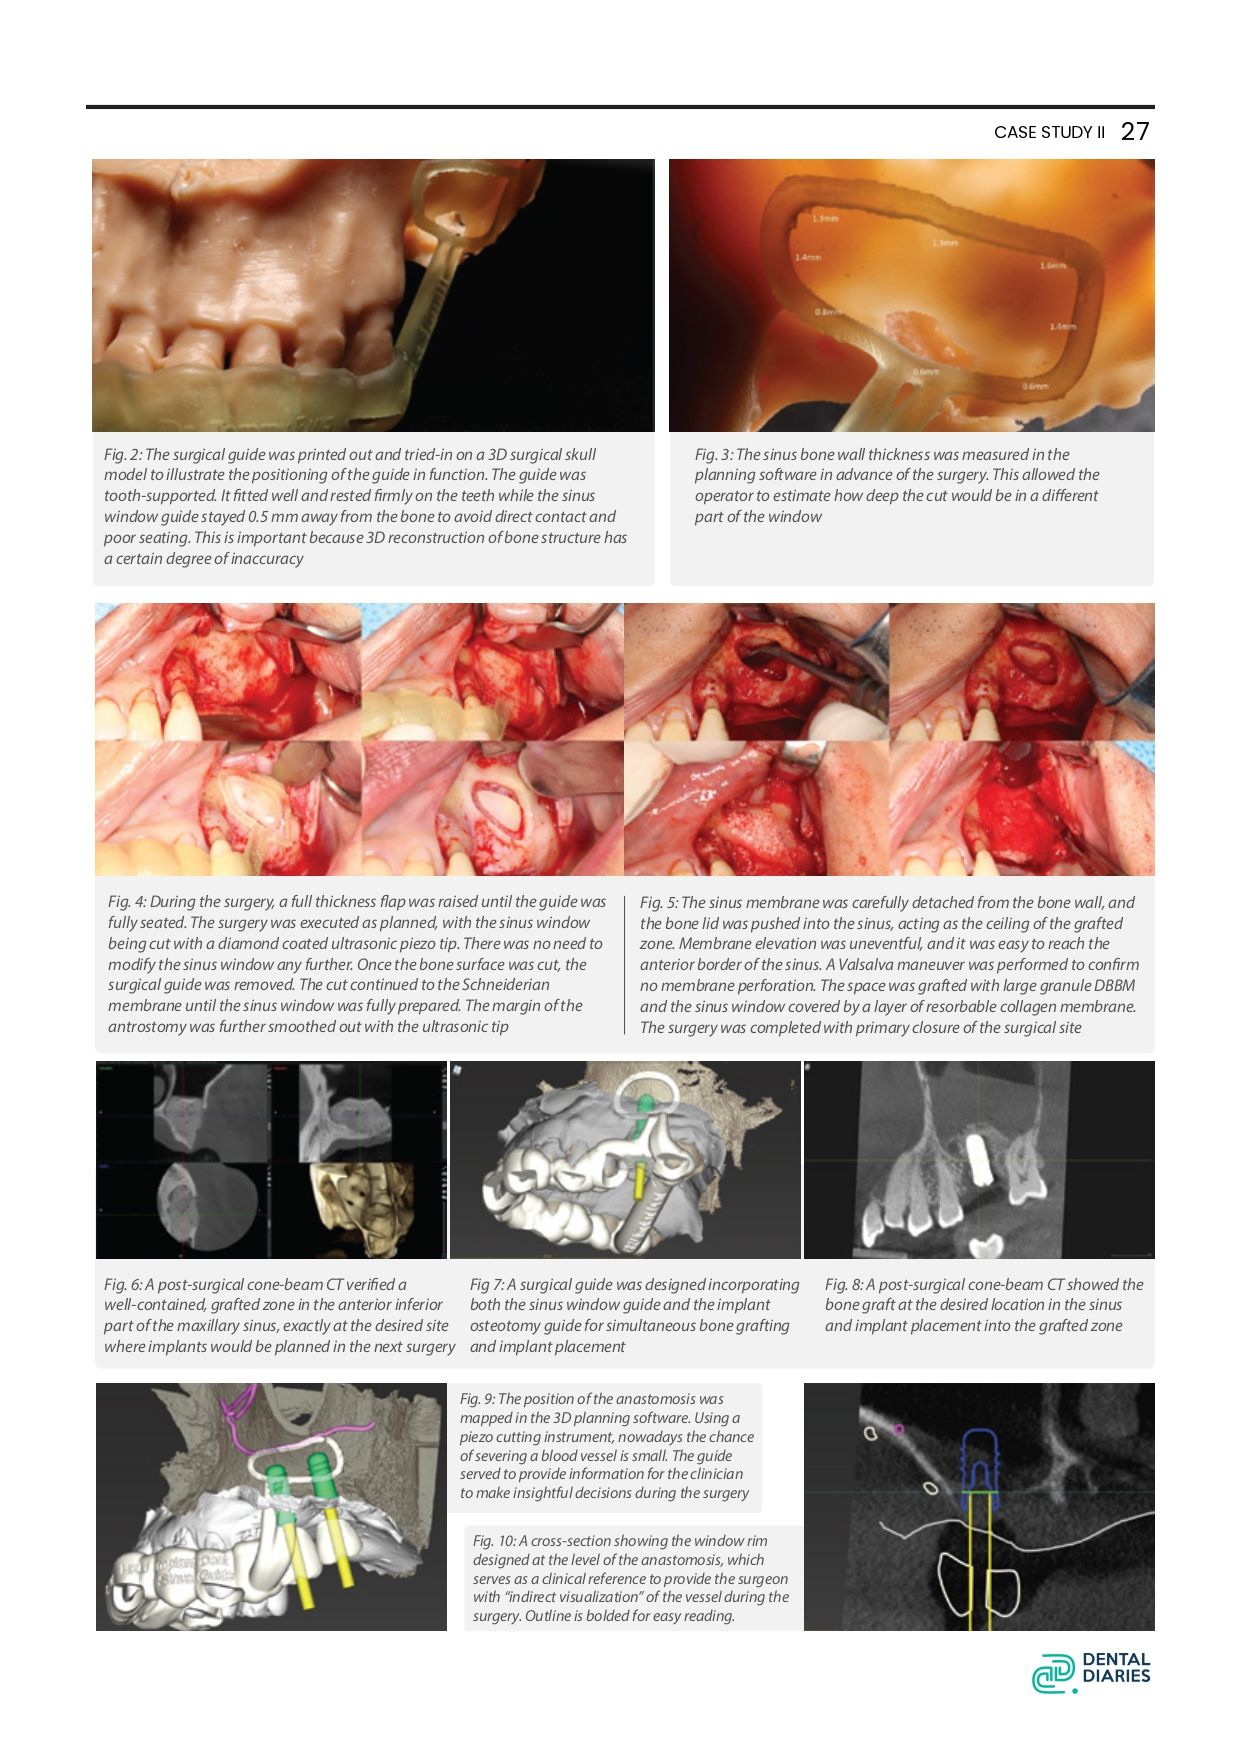
The next example demonstrates a case of similar design. Since residual bone height (4 mm) was sufficient to achieve good primary stability of an implant, SFE and implant placement could be performed simultaneously with a surgical guide incorporating both features, as described by Sun and co-authors (Sun et al., 2020). The surgical plan began with a proper prosthetic set-up of the missing tooth, with good alignment within the arch and occlusal loading directly opposite the mandibular teeth. The implant was virtually placed according to the set-up to allow axial loading, screw hole opening at the center of the occlusal table, and a periodontally friendly emergent profile design. After determination of the correct 3D positioning of the implant, the sinus window was designed to allow easy access to the location where sinus floor elevation and grafting were most needed, taking into consideration the anatomical characteristics mentioned previously. The surgery was performed accordingly.
Another example of a sinus guide that aimed to denote the position of an anastomotic artery on the sinus wall to provide an alert to the clinician by intentionally overlapping the upper rim of the window guide with the position of the vessel. The CBCT showed that a PSAA anastomosis ran across the sinus wall. After due consideration, the sinus window was designed to be inferior to the blood vessel to avoid getting the cut too close to it. With the naked eye, an intraosseous vessel is sometimes observed as a dark line running on the bony wall when a full thickness flap is elevated, but pre-surgical study of the cone-beam CT allows us to visualize it thoroughly. With a similar approach, a sinus guide can also be designed to locate the position of a sinus septum, as discussed in the literature (Teixeira, Sakurada, Philippi, & Goncalves, 2021; Wang, Ye, Sun, & Wu, 2021).
Conclusion
When state-of-the-art imaging techniques allow us to see beyond the surface anatomy, and CAD/CAM technology helps transfer our plan into the actual surgical field, the beauty of a surgery is to perform it as designed. With the popularization of ever more accurate and economical 3D printers, this has become more convenient than ever. The availability of digital tools opens up new possibilities. Their potential use is limited only by our imagination. Precise lateral window opening helps us to avoid some, but not all of the risks of sinus floor elevation surgery. Pre-surgical planning has become more demanding, but surgery time is shorter and improvements in safety benefit our patients, which is well worth the effort.
For more detail, check out the following material on the ITI Treatment Guide and ITI Academy:
For more detail, check out the following material on the ITI Treatment Guide and ITI Academy:
· ITI Treatment Guide Volume 5: Sinus Floor Elevation Procedures
· ITI Treatment Guide Volume 11: Digital Workflows in Implant Dentistry
· Surgical Planning and Procedures, Principles of Sinus Floor Elevation by Simon Storgard Jensen
· Surgical Planning and Procedures, Lateral Sinus Floor Elevation by Simon Storgard Jensen